How to create Java Application with Eclipse
java
application
eclipse
hello world

In this tutorial will create our first Java application using Eclipse. If you need help to properly configure your PC before start you can follow How to prepare a Windows Java development machine tutorial.
Note: This tutorial applies to Eclipse running on all operating systems: Windows, Linux, Mac Os.
Step1 - Create new Java Project
- From Eclipse select the menu item File > New > Java Project
- Choose the project name. e.g. JavaApp
Step2 - Adding a dependency
To add a dependency I will use as example MySQL JDBC Driver. Download the zip archive and unzip it in our project folder (I will use a lib folder).
To add the library as dependency you can use one of these three ways:
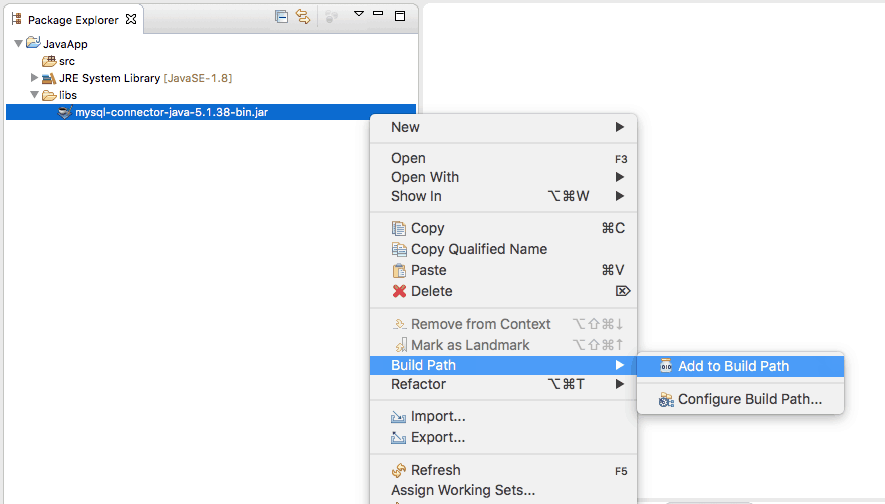
- One is to right click on the files from package explorer -> Build Path -> Add to Build Path.
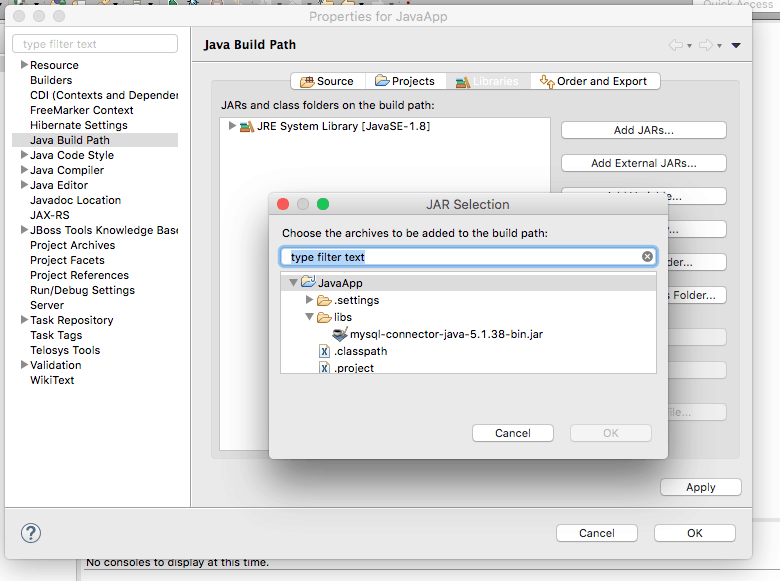
- Right-click on the project name in Package Explorer->select Properties -> Java Build Path -> Libraries -> Add JARs -> Navigate to the library and click OK.
- More advanced way (and the proper way) to add the dependency is first to create a variable and then to attach it to the project. Using this method the variable can be use to multiple projects, so you need to set up only once.
Step3 - Write a Java class
- Inside Eclipse select the menu item File > New > Class.
- Type the name and the package and click Finish.
I will edit the class to look like this.
package com.admfactory.app;

public class JavaApp {
    public static void main(String[] args) {
        System.out.println("Hello World! This is my first Java Application!");
    }
}
It's just a simple application to output a text.
Step4 - Run the program from Eclipse
To run the application from Eclipse:
- select from menu Run -> Run.
- from Run As window select Java Application and click Ok.
You can see in the console the text we are expecting.
Hello World! This is my first Java Application!Or from Package Explorer view:
- select JavaApp.java file and right-click on it;
- select Run As -> Java Application.
- from Run As window select Java Application and click Ok.
You can see the same result as first option. Note: the Run As windows will appear only once as the run configuration was is already created.
Step5 - Run the program from command line
To run the program from command line will use command prompt/terminal and navigate to the project root folder. if you need help on how to navigate you can check simple commands from Windows basics commands and tools tutorial. Cd commands applies to all operating systems.
Because Eclipse already compiled the Java code navigate to the project bin folder and run the command
java com.admfactory.app.JavaAppand you can see our "Hello World..." message.
Conclusions
As you can see is not complicated to create your first application. Any comments and suggestions are welcome.
References
- Eclipse website.


