Breathing Light LED on Raspberry Pi using C
Breathing
led
raspberry pi
C

In this article will make a light LED "breathing" using C. The light intensity will start from zero and gradually will increase up to maximum and then will decrease back to zero. To do this will use PWM signals. The PWM signal is a square-wave signal to control the amount of power going to the GPIO pin, in our case to the LED.
If you need more info on LEDs and how can be connected please follow the Blinking LED on Raspberry Pi using C tutorial. Also, if you want to see the same "breathing" LED circuit in other programming languages, please check the references section.
Components
- 1 * Raspberry Pi (I am using Raspberry Pi 3 Model B)
- 1 * 220Ω Resistor
- 1 * LED
- 1 * Breadboard
- 2 * Jumper wires
- software: WiringPi
Note: you can easily find all components on Amazon or Ebay (in my case, I bought a "Raspberry Pi starter kit" containing a lot of components).
Principle
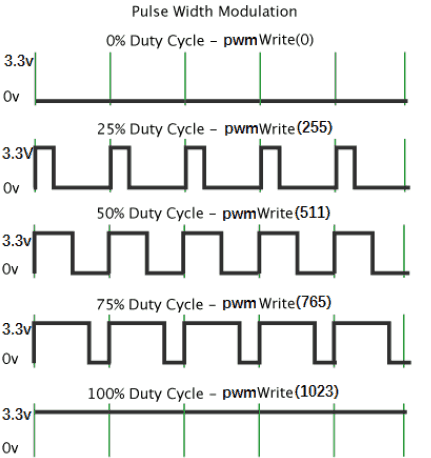
Pulse Width Modulation (PWM) is a technique for getting analog results with digital means. Digital control is used to create a square wave, a signal switched between on and off. The on-off pattern can simulate voltages in between full on (3.3 Volts) and off (0 Volts) by changing the portion of the time when the signal is on versus the time that the signal is off. The duration of "on time" is called the pulse width. To get varying analog values, you need to change the pulse width.
In the image above, the green lines represent the regular time interval.
frequency = 1/period = numbers of cycles/time
f = 1 / T = N / t
f = frequency, the cycles in a unit of time
T = period, the time required for one cycle
N = a number of cycles
t = an amount of time
For example, for a PWM frequency at about 500Hz, the green lines would measure 2 milliseconds each.
Schematics
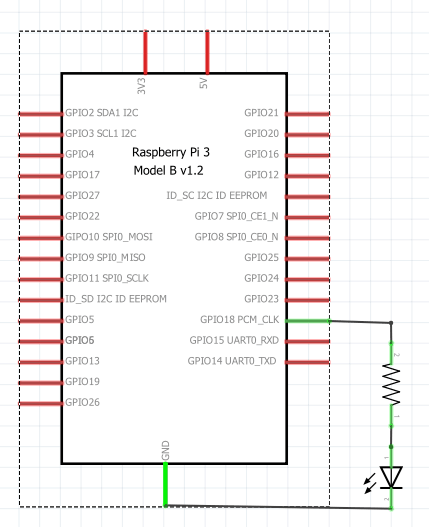
To do the schematics I used Fritzing software. For this tutorial, I will connect the cathode to the Raspberry Pi GPIO, also it is possible to connect the anode to the Raspberry Pi GPIO, check Blinking LED on Raspberry Pi using C tutorial for details.
Here is the schematic connecting the LED using the cathode of the LED connected to the Raspberry Pi GPIO. Using the Pinout website for reference, we can check the numbering, starting from physical pin 11(BCM pin 17, Wiring Pi pin 0). Because we are using PWM to control the intensity of light we as using pin 1 (BMC_GPIO 18, Phys 12).
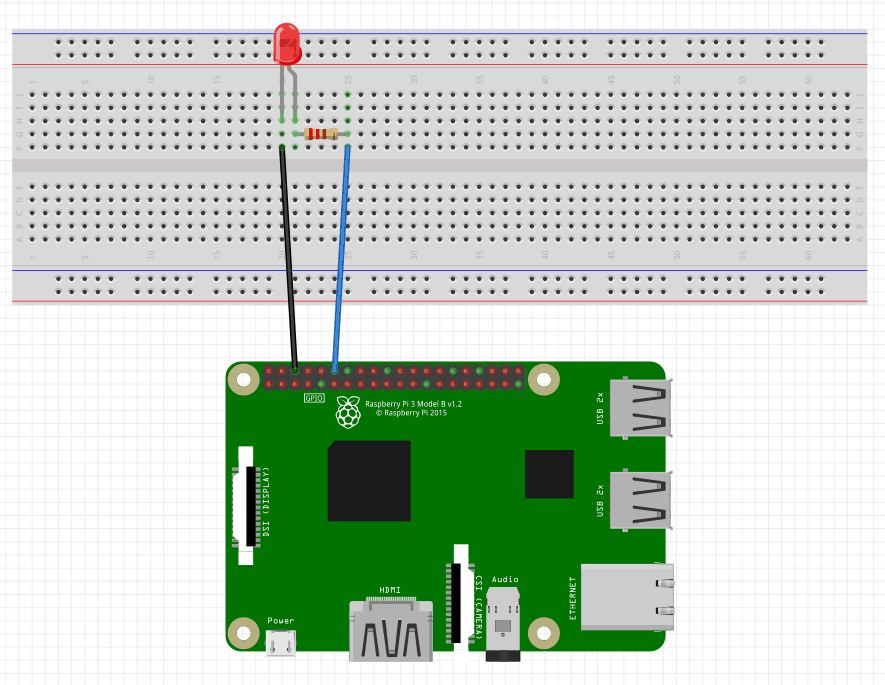
And the physical visualization of the circuit.
Hardware
Now it's time to connect everything according to the diagram presented in the section above.
Software
Key functions
-
pwmWrite(int pin, int value)Writes the value to the PWM register for the given pin. Note: This function is not able to control the Pi's onboard PWM when in Sys mode.
Note: all the code will be written directly on Raspberry PI console using vim editor. I've chosen this method because the example is simple and doesn't require a long time to edit. A better approach is to edit the source code locally, on your PC, using your preferable editor and then upload the code to Raspberry PI.
Login to Raspberry PI using ssh command from Linux and MacOS or using putty from windows, then open the vim editor using the following command:
$ sudo vim breathingLed.cCopy/paste the following code.
#include <wiringPi.h>
#include <stdio.h>

#define LedPin    1

int main(void)
{
	int i;

	if(wiringPiSetup() < 0) { //when initialize wiringPi failed, print message to screen
		printf("setup wiringPi failed !\n");
		return -1;
	}

	pinMode(LedPin, PWM_OUTPUT); //pwm output mode

	while(1) {
		for(i=0;i<1024;i++) {
			pwmWrite(LedPin, i);
			delay(1);
		}
		delay(1000);
		for(i=1023;i>=0;i--) {
			pwmWrite(LedPin, i);
			delay(1);
		}
	}

	return 0;
}
Save and close vim.
Test
To compile the application run the following command:
$ gcc breathingLed.c -o bLed -lwiringPiThe parameter "-o" is to specify a file name for the compiled executable program.
To run the application execute the following command:
$ sudo ./bLedYou should see the LED light "breathing".
References
- Fritzing software used in this article to generate the schematic and all images.
- Pinout interactive website.
- Breathing Light LED on Raspberry Pi using Python
- Breathing Light LED on Raspberry Pi using Java


